I am happy to report that I survived wedding cake class round one. I made six (yes six) delicious round cakes, trimmed them in every way possible and crumb iced them with buttercream. Here is one of the six cakes.
Chef P requested a three layer cake with a minimum of 3 inch layers. I definitely delivered on the height. This weekend we're going to spread on a final layer of icing, decorate the sides with some filigree and strategically position a few gum paste flowers on top. Here are my layers waiting to go into the freezer for the week.
I made a different kind of cake last week as well. Two varieties of cupcakes, both topped with a glace icing. It was a double duty endeavor. First, good practice for my co-worker's upcoming baby shower and second, cupcakes for my parent's wedding anniversary.
The cupcake recipes were very simple - almost too simple to be fabulous - and the icing was made of lemon juice and powdered sugar. It was very easy to drizzle on and it set prettily on top of the cupcakes, but the taste was rather tart. I think I'll stick to buttercream icing in the future.
My most exciting news from last week is that I have officially started my pre-internship at a local bakery. I am on bread duty and I love it. I was fairly nervous the first few days, but now I feel like I'm really contributing to the bakery and getting a great experience in return. I have made several types of bread already and my specialty is quickly becoming baguettes. I made one on my second day that I was pretty proud of and was allowed to take home at the end of my shift. Here she is.
I immediately scarfed down three quarters of it when I got home, but Greg did get to sample a few bites. This week I had more good baguettes than slightly inconsistent ones and I'm getting faster every day as well. It's fairly monotonous work that might not make for good blog posts, but I am definitely enjoying myself. And I'll continue to entertain you with projects from class or items from my home kitchen. Like the orange chocolate bundt cake that I'm making tomorrow. Get your eyeballs ready.
During my childhood, I occasionally watched an episode of "This Old House" starring Bob Vila with my dad. Bob Vila always made undertaking huge house projects seem easy. I never saw Bob make a gingerbread house, but I'm sure he could have given me a few tips last Saturday when I was building mine.
My gingerbread dough turned out great and after cutting out templates for my houses, I rolled out the dough and cut out the pieces to bake. I also cut out holes for the windows.
We melted sugar to pour in the window frames and it gave the windows a very realistic look. Next, I made a batch of royal icing to start gluing my house together. Bob Vila uses nails, chefs use icing. These fours walls were up in no time.
Orange Reese's Pieces on the front of the house? Of course. When this was finished, I decided to attach my roof. This is where I needed the Bob Vila hotline. I made my roof slabs slightly larger than the side pieces so there would be some overhang, but I didn't think about making them slightly thinner so they wouldn't weigh so much. This is some heavy duty gingerbread.
If you haven't already guessed, I glued my roof on top and while I was decorating the rest of the house, it promptly decided to collapse. Thinking fast, I broke pretzel rods in half and lined them up along the top of the house. Chef Vila, I mean P, helped me cut down my roof a bit so that it would fit better with the pretzels as support and all was well. Almost....don't look too closely at my roof on the back right side. It's a good thing it doesn't rain in candy land.
I went for a pretzel motif on the back and a sprinkling of red hots all around. The marshmallow fence is surrounding candy corn lights underneath the windows. There are even grazing deer near the tree.
In the end, everything was fine and I took home a nice house. But since this old house almost destroyed my grade in class, I decided it might be fun to destroy it in the street in front of our house. Okay, it was really Greg's idea, but I was totally on board. Plus, I didn't want it to start attracting ants to our dining room table. Here is the documented destruction.
Me and this old house on our street.
The house plummeting to its demise.
Is anyone getting a Wizard of Oz flashback here?
The wicked old gingerbread house is dead.
I must say, this was very cathartic and a ton of fun. Perhaps I'll feel the urge to smash my wedding cake next Saturday? I guess we'll have to wait and see.
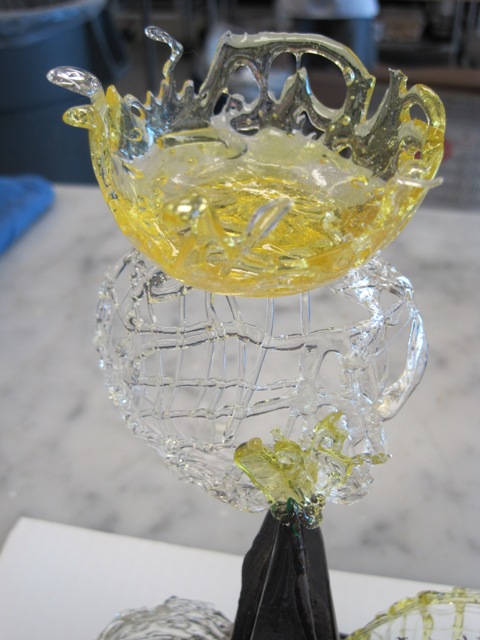
My work of sugar art is complete. And no (additional) body parts were injured in it's completion! I actually had a ton of fun creating different designs, sugar cages and flowers this week and managed to glue the whole thing together without drizzling hot sugar anywhere it shouldn't be drizzled. Here is what I have entitled "el azucar...hazlo."
As the proud designer, I paparazzi-ed the heck out of it. Here are the close-ups, views from above and behind, etc.
Honestly, I took so many pictures in class because I was fairly certain "el azucar" was not going to make it home in one piece. And I was right. The pieces in the last photo plunged to their sugary death before I left the kitchen. Luckily, I had already received my grade and praise from Chef P.
I am finished with another term of pastry school and will begin my last - that's right, LAST - term in the kitchen this weekend. It's terrifying yet exhilarating at the same time. After this term, it's internship time! But let's not get ahead of ourselves. The first four weeks of my final kitchen class are all about architecture and design skills. We'll be creating a gingerbread house and a wedding cake. I'm obviously more excited about the gingerbread house...
p.s. In case you're dying to know, my work of sugar art is entitled "sugar...do it" in English. Hazlo is a Spanish command that I was taught a few terms ago so I can yell at cooks in the kitchen. Or in my case, for myself when I was burned with sugar and hesitant about working with it again. It was definitely worth the end results.
While I have always enjoyed singing along to Def Leppard's classic hit "Pour Some Sugar on Me," I never thought I'd actually experience this phenomenon in real life. And then Saturday in class, I literally poured some hot sugar on myself. I turned out more blistered and burnt than sticky sweet, but I guess that's what happens when you boil said sugar to 320 degrees before it hits your body.
Here's my rendition of "Pour Some Sugar on Me."
I can't see if the sugar is hot enough. Let's take a closer look.
We are boiling now, but it still needs to be about 90 degrees hotter. Sugar that hot should not be poured on anyone, even if you are a rock band groupie. Here's the price you'll pay.
Luckily I was on my way to the sink to wash off my thermometer when I "caught" the sugar in my hand so I was able to wash it off before my skin became too attached to it. After some vinegar soaking, Advil taking and gauze wrapping in class, I was ready to prepare a second batch of sugar in the afternoon. Once I got over my fear of getting burned (by actually getting burned), the sugar was really quite fun to work with. We poured casts for our centerpiece displays and then made ribbons, flowers and other designs with pulled sugar.
My main centerpiece is a dark green color with gold accents.
And I used lighter colors to make designs with later in the day.
The scraps are hard like glass shards and you could probably cut yourself on them. Thankfully, I did not.
I made a mini-heart display for my parents to take home after their visit on Sunday.
Shockingly, the pieces made it all the way to their house without my mother eating them. Probably because she devoured all of the leftover chocolates we saved from the previous week. And dessert. I caramelized bananas with my fancy new torch and threw them into a bowl of homemade vanilla bean ice cream with pieces of my chocolate box. (Yes, this is what the vanilla bean was used for!)
Can you see the tiny bean flecks?
If not, just imagine them. They look like dirt but taste way better.
I also made homemade lasagna and garlic bread for our lunch on Sunday. The garlic bread was truly homemade as well. I made a batch of country white bread earlier in the week.
Next time I'll score the bread a little deeper so the air doesn't escape out the sides during baking, but it turned out delicious and made for wonderfully hearty garlic bread.
Despite my unfortunate incident with sugar, I'm ready to finish up my centerpiece this weekend and move on to the next (and final!) term in the school kitchen. And I'll limit my sugar pouring to singing along with the band.